Chocolate, Cherry, and Amaretto Cake
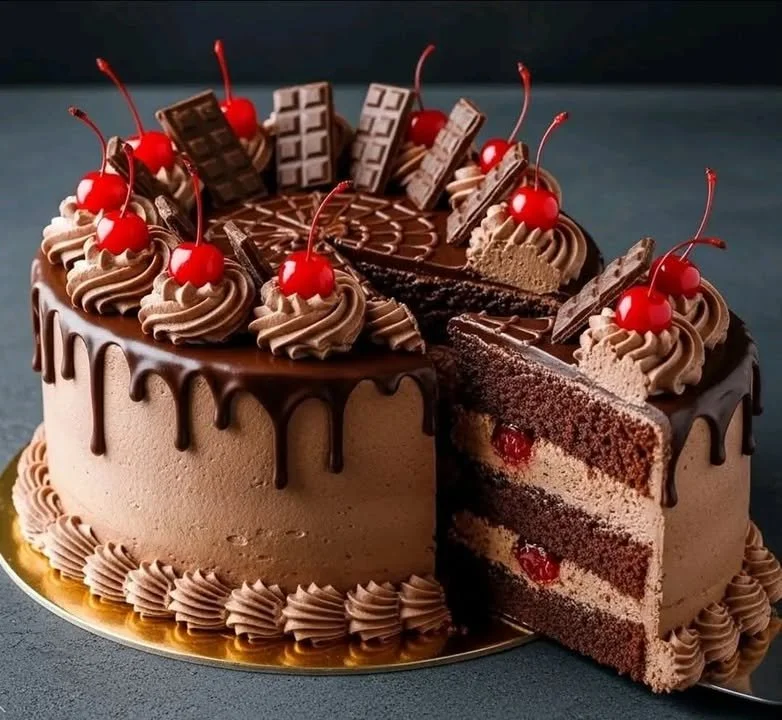
If you’re looking for a delightful dessert to impress your family or friends, this Chocolate, Cherry, and Amaretto Cake is a perfect choice. The rich chocolate flavor, paired with juicy cherries and a touch of amaretto, creates an indulgent treat that will leave everyone wanting more. Imagine slicing through soft layers of chocolate cake, only to find sweet cherries peeking out from between them. The aroma of baked chocolate and cherries fills the air, making it hard to resist. 🍫🍒 #ChocolateCherry #HomemadeDessert
This recipe not only looks beautiful on the plate but also offers a unique twist that sets it apart from regular chocolate cakes. It’s a great way to elevate your baking game while enjoying a delicious treat!
Why Make This Recipe
Here are a few reasons why you will love making this Chocolate, Cherry, and Amaretto Cake:
- It combines rich chocolate, sweet cherries, and a splash of amaretto for a unique flavor.
- It’s perfect for special occasions like birthdays, anniversaries, or any celebration.
- The cake is easy to make, even for beginner bakers.
- The creamy frosting and cherry filling add extra sweetness and joy to every bite.
- It’s a wonderful way to showcase seasonal fruits like cherries when they are fresh!
How to Make Chocolate, Cherry, and Amaretto Cake
Making this Chocolate, Cherry, and Amaretto Cake might sound complicated, but it’s quite simple. Follow the steps below to create a stunning cake that tastes as good as it looks!
Ingredients
- 2 cups flour
- 2 cups sugar
- 1 cup Dutch-processed cocoa powder
- 2 teaspoons baking soda
- 1 teaspoon salt
- 2 eggs
- 1 cup buttermilk
- 1 cup vegetable or canola oil
- 1 1/2 teaspoons vanilla
- 1 cup boiling water
- 1 cup freshly sliced and pitted cherries
- 1 cup water
- 1/2 cup sugar (for cherries)
- 3 tablespoons amaretto syrup
- 2 cups butter (for frosting)
- 1 tablespoon almond extract
- 10 tablespoons cocoa (for frosting)
- 8-10 cups powdered sugar (for frosting)
- 5-6 tablespoons amaretto syrup (for frosting)
- 3-4 tablespoons milk (for frosting)
- Sliced unsweetened chocolate (optional for garnish)
Directions
- Step 1: Preheat oven to 300°F (150°C).
- Step 2: In a large bowl, mix flour, sugar, cocoa powder, baking soda, and salt until combined.
- Step 3: Add eggs, buttermilk, oil, vanilla, and boiling water to the dry ingredients. Stir until well combined.
- Step 4: Prepare three 8-inch cake pans and divide the batter evenly between them.
- Step 5: Bake for approximately 30 minutes or until centers are firm and a toothpick comes out clean.
- Step 6: Remove from oven and let cool in pans for approximately 5 minutes before transferring to wire racks to cool completely.
- Step 7: To make cherries, combine sliced cherries, water, sugar, and amaretto syrup in a saucepan. Bring to a boil and simmer for approximately 5 minutes to soften cherries. Drain and dry, then let cool.
- Step 8: To make glaze, beat butter until smooth, then add almond extract and amaretto syrup and mix well. Mix in cocoa powder, then gradually add powdered sugar until desired consistency is reached. Add milk as needed.
- Step 9: To assemble cake, place one cake layer on a turntable and spread about 1 cup of frosting over the top. Place half of the sliced cherries on top of frosting. Repeat with the next cake layer.
- Step 10: Cover outside of cake with remaining frosting and decorate as desired. Optionally garnish with sugar-free chocolate shavings. Enjoy!
Tools You’ll Need
- Mixing bowls
- Electric mixer or whisk
- Measuring cups and spoons
- Cake pans (3 – 8 inch)
- Cooling racks
- Saucepan for cherries
- Cake turntable (optional)
How to Serve Chocolate, Cherry, and Amaretto Cake
Serve your delicious Chocolate, Cherry, and Amaretto Cake with a scoop of vanilla ice cream for a classic pairing. It also goes wonderfully with a cup of coffee or tea. For an extra special touch, consider adding fresh cherry slices or a drizzle of amaretto syrup on top.
How to Store Chocolate, Cherry, and Amaretto Cake
Store any leftover cake in an airtight container at room temperature for up to three days. If you want to keep it fresh for longer, refrigerate it for up to a week. To reheat, simply slice a piece and warm it in the microwave for a few seconds.
Tips to Make Chocolate, Cherry, and Amaretto Cake
- Make sure your ingredients are at room temperature for better mixing.
- Don’t overmix the batter; stirring until just combined helps keep the cake light and fluffy.
- For an even moister cake, consider using a simple syrup on the layers before adding the frosting.
- Feel free to adjust the amount of amaretto syrup to match your taste preference.
Variation
If you want to switch things up, try adding other fruits like raspberries or strawberries for a different flavor combination. You can also experiment with different extracts, such as coconut or pure vanilla, in the frosting for a unique twist.
FAQs
1. Can I use different types of cherries?
Yes! You can use frozen cherries if fresh ones are not available. Just make sure to thaw and drain them before using.
2. Is there a way to make this cake gluten-free?
Absolutely! Substitute the all-purpose flour with a gluten-free flour blend that measures cup-for-cup.
3. Can I make this cake ahead of time?
Yes! You can bake the cake layers a day ahead and store them in the refrigerator. Frost them the day you plan to serve.
4. How can I make it less sweet?
You can reduce the amount of sugar in both the cake and frosting. Taste and adjust to your liking.
5. Does it have to be refrigerated?
The cake can stay at room temperature for a few days, but if you live in a warm climate or want to keep it fresh longer, refrigeration is a good option.
Personal Cook’s Note
I first made this Chocolate, Cherry, and Amaretto Cake for my sister’s birthday. She loves chocolate and cherries, so it felt like the perfect match! Watching everyone enjoy the cake brought me so much happiness. The combination of flavors is truly soulful and one that triggers wonderful memories for our family. I invite you to try this recipe, and I would love to hear about your experience with it. Please share your thoughts or any tips you have in the comments below. Happy baking!


