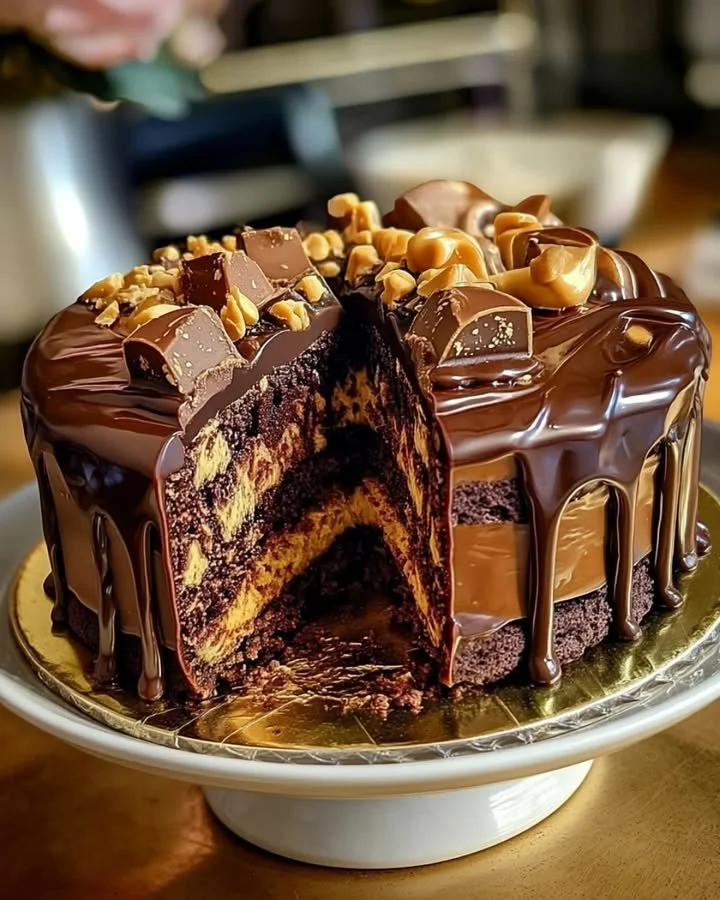
Decadent Chocolate Peanut Butter Layer Cake
If you are a chocolate lover, then the Decadent Chocolate Peanut Butter Layer Cake is just what you need! This cake will make your taste buds dance with joy. Imagine two soft layers of rich chocolate cake, filled with creamy, dreamy peanut butter. Topped with silky chocolate ganache, this cake is not just dessert; it’s a celebration! Perfect for birthdays, holidays, or any day you want to treat yourself and your loved ones. Don’t forget to add #ChocolateLovers and #PeanutButterDelight to your social media posts after you create this delicious masterpiece!
What makes this recipe stand out is its simple yet rich flavors. The combination of chocolate and peanut butter creates a harmony that is both satisfying and indulgent. You don’t have to be a professional baker to whip up this gorgeous cake; with clear steps and easy ingredients, this recipe is within everyone’s reach.
Why Make This Recipe
You’ll love making this Decadent Chocolate Peanut Butter Layer Cake for several reasons:
- Irresistible Flavor: The blend of chocolate and peanut butter is a winning combination.
- Perfect for Any Occasion: Whether it’s a birthday or a casual get-together, this cake will impress!
- Easy to Follow: Our simple recipe ensures that even novice bakers can create this stunning cake.
- Customizable: You can tweak the flavors or add different toppings to make it your own.
- Family-Friendly: Everyone in your family will adore this delightful dessert!
How to Make Decadent Chocolate Peanut Butter Layer Cake
This cake may look fancy, but it’s straightforward to make. We start with two soft, luscious chocolate cake layers that are rich and moist. You’ll whip up a smooth peanut butter filling that’s to die for. Finally, the piece de resistance is a beautiful dark chocolate ganache poured over the top. Follow these steps, and you’ll have a cake that everyone will love.
Ingredients:
- 2 cups all-purpose flour
- 1 3/4 cups granulated sugar
- 3/4 cup unsweetened cocoa powder
- 2 teaspoons baking powder
- 1 1/2 teaspoons baking soda
- 1 teaspoon salt
- 2 large eggs
- 1 cup whole milk
- 1/2 cup vegetable oil
- 2 teaspoons vanilla extract
- 1 cup boiling water
- 1 cup creamy peanut butter
- 1 cup heavy cream
- 2 cups dark chocolate chips
- Crushed peanuts for garnish
Directions:
- Step 1: Preheat your oven to 350°F (175°C). Grease and flour two 9-inch round cake pans.
- Step 2: In a large bowl, whisk together the flour, sugar, cocoa powder, baking powder, baking soda, and salt until well combined.
- Step 3: Add the eggs, milk, vegetable oil, and vanilla extract to the dry ingredients. Beat on medium speed for 2 minutes until smooth.
- Step 4: Carefully stir in the boiling water until the batter is well combined (the batter will be thin).
- Step 5: Pour the batter evenly into the prepared cake pans. Bake for 30-35 minutes, or until a toothpick inserted into the center comes out clean. Let the cakes cool in the pans for 10 minutes, then transfer to wire racks to cool completely.
- Step 6: In a medium bowl, beat the creamy peanut butter until smooth. In another bowl, whip the heavy cream until stiff peaks form. Gently fold the whipped cream into the peanut butter until well combined.
- Step 7: Once the cakes are completely cooled, place one layer on a serving plate. Spread half of the peanut butter filling over the top. Place the second layer on top and spread the remaining filling on top of the cake.
- Step 8: In a microwave-safe bowl, heat the dark chocolate chips in 30-second intervals, stirring in between, until melted and smooth. Pour the ganache over the top of the cake, allowing it to drip down the sides.
- Step 9: Sprinkle crushed peanuts on top for decoration. Slice and serve this decadent cake to your friends and family!
Tools You’ll Need
- Mixing bowls
- Whisk
- Electric mixer
- Measuring cups and spoons
- Two 9-inch round cake pans
- Cooling rack
- Microwave-safe bowl
How to Serve Decadent Chocolate Peanut Butter Layer Cake
This cake is best served at room temperature. Slice it into generous pieces and serve it plain or with a dollop of whipped cream. You can also pair it with vanilla ice cream for an extra treat. It’s perfect for parties or a special family dessert.
How to Store Decadent Chocolate Peanut Butter Layer Cake
Store leftover cake in an airtight container at room temperature for up to 3 days. If you prefer, you can also refrigerate it for up to a week. To reheat, simply place a slice in the microwave for 10-15 seconds.
Tips to Make Decadent Chocolate Peanut Butter Layer Cake
- Make sure your eggs and milk are at room temperature for a smooth batter.
- Do not skip the ingredient “boiling water” as it helps make the cake extra moist!
- Feel free to experiment with different types of chocolate chips if you want to change up the flavor.
- Let the cake cool completely before assembling to avoid melting the peanut butter filling.
Variation
You can customize this cake in many ways. Consider adding crushed cookies or candies in the peanut butter filling for added texture. If you prefer a lighter cake, you may substitute the heavy cream with whipped topping.
FAQs
Can I use natural peanut butter?
Yes! Natural peanut butter will work, but it may be a bit more runny. Just make sure it’s well mixed.Is this cake gluten-free?
No, but you can use gluten-free flour for a gluten-free version.Can I freeze the cake?
Yes! Wrap the cake tightly in plastic wrap and freeze it for up to three months.What should I do if my ganache is too thick?
If your ganache is thick, you can reheat it gently and add a bit of cream to thin it down.
Personal Cook’s Note
When I first made this Decadent Chocolate Peanut Butter Layer Cake, I was amazed at how quickly my family gobbled it up! The rich flavors mixed so well, and the creamy filling was a hit. I suggest making an extra batch of the peanut butter filling; it’s perfect for spreading on toast! I’d love to hear your thoughts on this recipe or any tips you might have from your own baking adventures. Happy baking, and enjoy every slice!

